
ADVANCED CORONARY LIFE SUPPORT (ACLS) - PART II
Airway and Ventilation Management
Description:
This one-hour continuing education
course updates the prehospital care provider with the latest airway
assessment and management methods utilized in advanced cardiovascular
resuscitation. It discusses the most basic to advanced methods and
the newest recommended advancements. It is suitable for both BLS and ALS
providers.
Target Audience: BLS and ALS
CE Units: 1.0
THIS COURSE DOES NOT RESULT IN ACLS
CERTIFICATION OR RECERTIFICATION.
Note: This course demonstrates the current standards of care according to the American Heart Association and others and is not meant to replace your local protocols or standing orders.
Also Note: Any procedure described herein that exceeds your scope of practice should not be attempted.
OBJECTIVES
On completion of this one hour continuing education course the student will be able with 80 % accuracy to:
1.
Describe the steps of a primary and secondary ABCD assessment
2.
Describe basic and advanced airway assessments that indicate immediate
intervention is needed to provide an adequate client airway
3.
Describe basic and advanced respiratory assessments that indicate
immediate intervention is needed to provide adequate client ventilation
4.
Describe indications for and correct use of the following basic airway and
ventilation adjuncts-
a.
pocket mask
b.
oropharyngeal airway
c.
nasopharyngeal airway
d.
nasal oxygen cannula
e.
non-rebreather oxygen mask
f.
bag-valve-mask device
g.
orotracheal suction
5.
Describe indications for and correct use of the following advanced
airway and ventilation adjuncts-
a.
tracheal tube
b.
Combitube
c.
laryngo-mask airway
d.
end-tidal CO2
detector
e.
esophageal aspirator
The Primary ABCD Assessment & Intervention
“A” = Basic Airway Assessment
and Maintenance
After determining a client is unable to keep his/her own airway open adequately, intervention is the first order of business. This may be as simple as hyperextending the client’s neck using a head-tilt, chin-lift maneuver. This assumes the client is not suspected of having spinal trauma. Do not manipulate the cervical spine if trauma is suspected. Open the airway by stabilizing the head from lateral movement and then placing the hands on the client’s cheeks and performing a jaw-thrust maneuver.
The
next most important thing to consider is the blood flow and the efficiency of
oxygenation of that blood. If the
lungs do not function properly because they are diseased or otherwise hampered
the body will not receive enough oxygen. If
there is inadequate oxygen being delivered to the lungs during resuscitation the
body will not receive enough oxygen. Unfortunately
the first place we observe the result of inadequate oxygenation after
resuscitation is the brain. Hypoxic
encephalopathy is a grave outcome after resuscitation. That is why the airway and respiration portion of ACLS is so important.
Another case for adequate oxygenation during resuscitation is that
electrical therapy and many resuscitation drugs are more effective in a
well-oxygenated environment. This aspect is covered in-depth in another section
of the ACLS course.
Oropharyngeal Airway (OPA)
At this point the provider may opt to use a basic airway adjunct. If the client is totally unconscious, you may use an oropharyngeal airway (OPA). To determine if the client is unresponsive enough that this airway will not elicit a gag reflex, gently brush the eyelashes. If the client does not blink, this generally indicates they are obtunded enough to safely introduce the OPA. Even so, be alert for signs of gagging.
OPAs come in sizes. The correct size is determined by approximating the placement of the OPA alongside the client’s face. Place the flange at the corner of the mouth and the tip at the earlobe or angle of the jaw (Sanders, 2001). If the closest size is too big, select a size smaller. Bigger is not better, as the excess may actually become an airway obstruction by crossing the opening of the trachea and blocking air passage. An OPA that is too small may drop into the airway and become an obstruction.
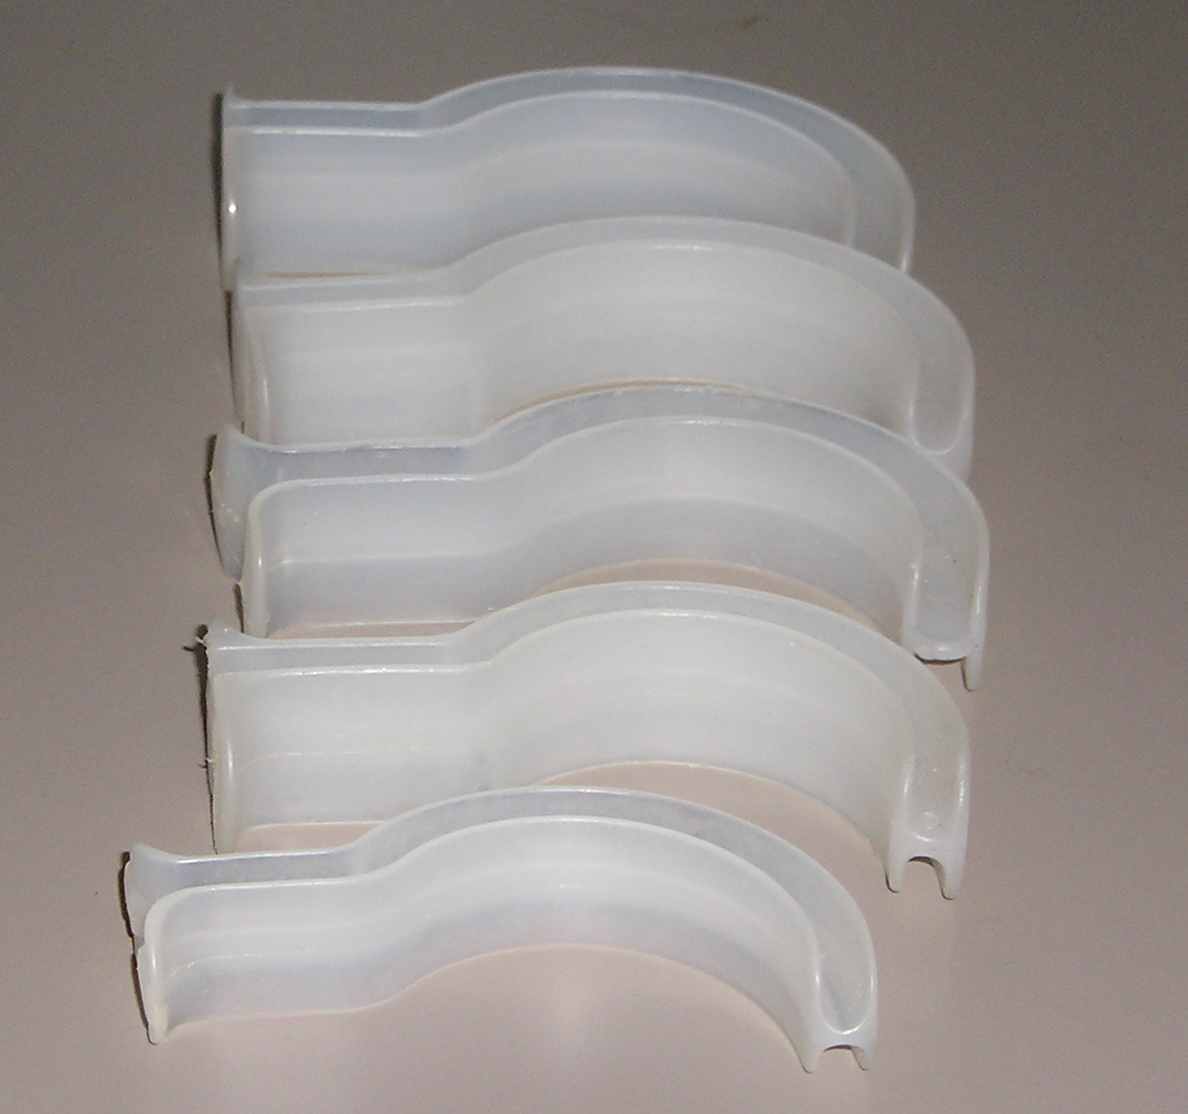
Oropharyngeal Airways
Introduce the OPA into the mouth with the open aspect of the “C” shape
facing the client’s forehead and then rotate it 180 degrees as you introduce
it into the throat, until it comes to rest with the flange at the lips. If the
OPA does not seat, gentle hyperextension of the neck will allow it to drop into
place, assuming there is no spinal trauma. If that is not possible use a
tongue-jaw-lift maneuver to help placement, again assuming no spinal trauma.
Do not force it into place. During
and after placement be careful that the lip or tongue does not become entrapped
with the OPA, causing trauma.
It is important to remember that hyperextension of the neck is still
necessary while using this device. The
OPA is an adjunct, not an actual airway. It
is also important to watch for the possible return of a gag reflex.
Nasopharyngeal Airway (NPA)
If the client is not completely unconscious, use a nasopharyngeal airway (NPA).
These airways are often used in semiconscious drug overdosed clients or
diabetics. Do not use the NPA in the client receiving anticoagulation therapy.
The NPA also comes in various sizes and is measured from the tip of the
nose to the tragus of the ear. This
is the cartilaginous prominence just above the earlobe (Sanders, 2001). Again,
if the airway is too big, select a smaller size.
Lubricate the NPA with a water-soluble gel before insertion.
Do not use petroleum based lubricants such as Vaseline.
Look at the client’s nares and determine which seems larger.
Insert the NPA carefully into the larger nare so as not to induce
unnecessary trauma. Allow it to
follow the path by gently advancing it into place.
If the airway tip meets resistance, gently rotate it to assist with
advancement. If you meet resistance
the nasal septum may be so deviated that you should remove the NPA and attempt
insertion in the other nare. This airway also requires you to maintain
hyperextension to assure good airway clearance.
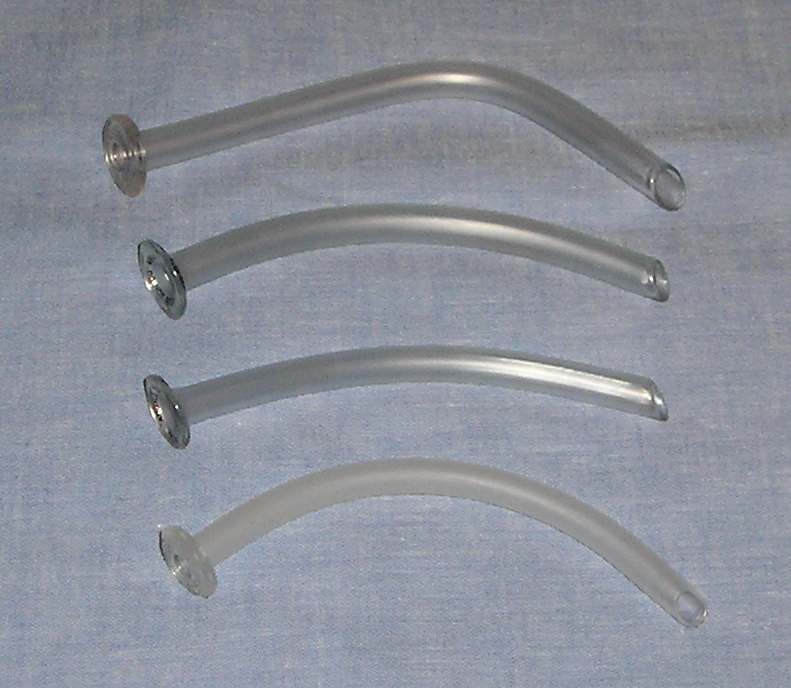
Nasopharyngeal Airways
Neither the OPA nor the NPA should be forced into place. Sometimes just
some additional hyperextension of the neck will allow them to drop into place.
Another way to encourage proper placement is to use the tongue-jaw-lift
technique to allow passage of the NPA. Both of these devices require a brief
additional moment for insertion, but pay dividends in airway maintenance.
It is well worth the provider’s time to become proficient at utilizing
these adjuncts.
“B” Breathing Assessment & Intervention
Next is the issue of breathing: is it adequate? The normal adult respiratory rate is between 12 and 16
respirations per minute. Are they
faster or slower? Is there adequate
volume with each respiration, are they too shallow or are they noisy with
grunting or audible wheezing? How
much effort does breathing take? What
color is the client’s skin: pink, pale, ashen or cyanotic?
All of these may be indications for supplemental oxygen.
Nasal Cannula
The nasal oxygen cannula is the most commonly used device to deliver
supplemental oxygen. This is small
tubing with two nasal prongs that fit into the nose and deliver oxygen.
Tubing loops wrap around each ear to secure the cannula in place.
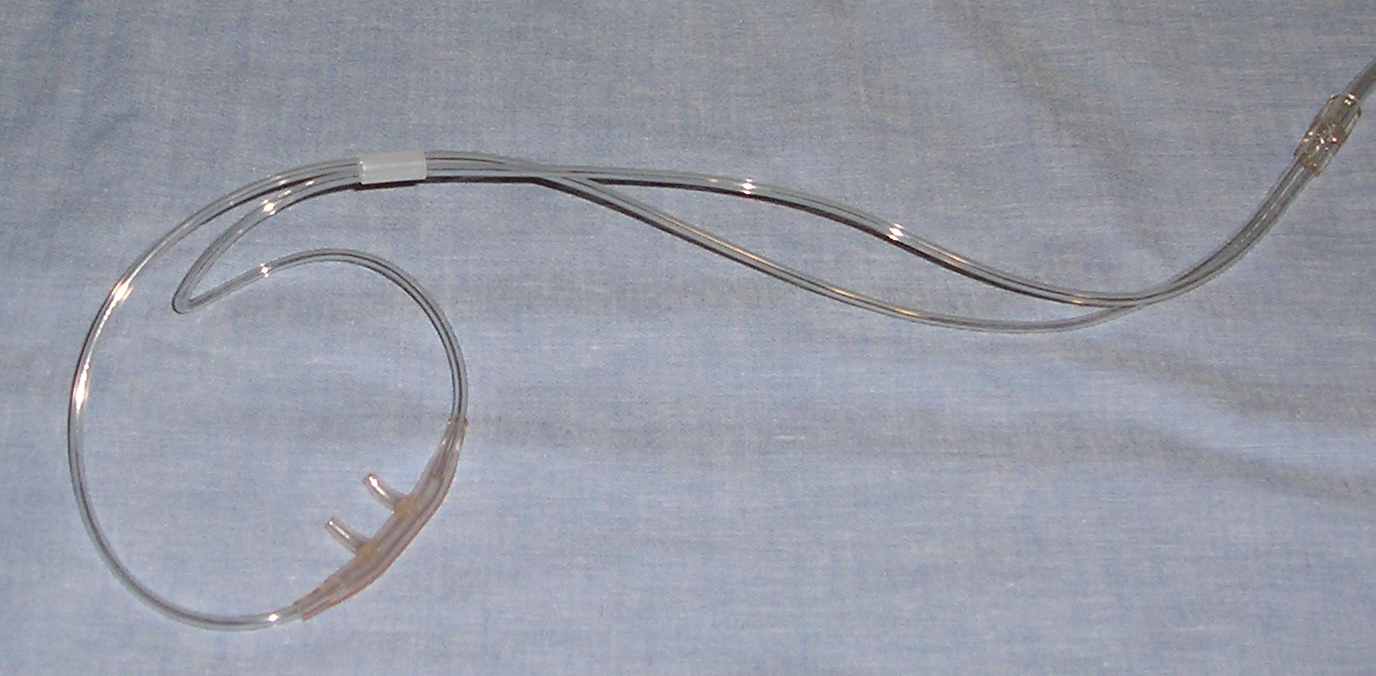
Nasal Cannula
The nasal cannula is flowed at between two and six L/m.
Do not flow it any higher. If
additional oxygen is required, use a mask.
When oxygen is flowed at 2-6 L/m oxygen concentration is between 28% and
44%.
Oxygen Mask (plain)
This simple oxygen mask used with supplemental oxygen delivers
approximately 60% oxygen.
Oxygen Mask with Venturi
If exact levels of oxygen are required, small venturi may be adjusted to
deliver specific levels of concentration. Venturi
are color-coded based on the percentage of oxygen they deliver.
These are used for longer-term administration to clients who retain
carbon dioxide.
Oxygen Masks (Non-rebreather)
Intervention may be required if the client is not breathing adequately
enough to oxygenate. The client’s respirations may be adequate, but they are
not oxygenating properly. This
client will exhibit ashen or cyanotic skin color and will benefit from
supplemental oxygen and because of the skin color should receive oxygen through
a non-rebreather (NRB) mask with a reservoir.
The NRB mask should have an oxygen flow of ten L/m. In some oxygen systems
that do not keep the reservoir inflated that flow rate may have to be higher.
The objective is to keep that bag/reservoir inflated.
At this rate, the oxygen concentration is nearly 100%.
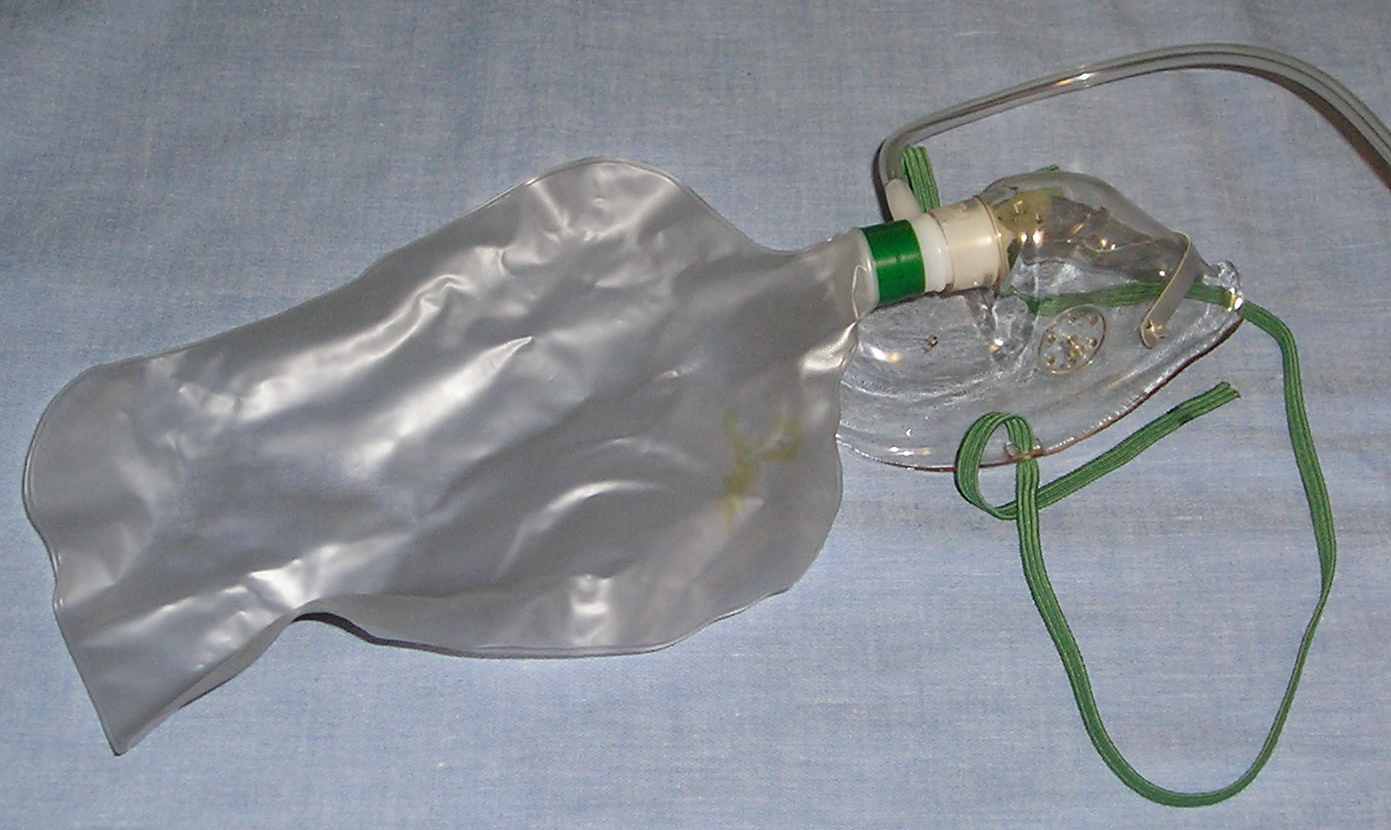
Non-Rebreather Mask
This mask is simply applied by starting the desired flow of oxygen through
the mask and placing it on the client’s face over the mouth and nose.
There is a little metal nose clip that can be compressed to help the fit
over the bridge of the nose. Do not
pinch it too tight. To encourage
the inflation of the bag before placing it over the client’s face, briefly
place your finger over the orifice inside the mask that introduces the oxygen
into the mask, so that it temporarily blocks enough to allow the reservoir to
inflate.
During oxygen administration with any mask observe carefully for signs of emesis.
If the client begins to vomit and is unable to manage his/her own emesis,
remove the mask and turn the client on the side to allow the contents to flow
out, then wipe away any additional emesis and resume oxygenation.
Have suction available and utilize it rapidly if necessary.
Pocket Mask
Medical professionals should have a pocket mask nearby wherever you are,
especially when you are out and about. If
folks know you are a professional they expect you to do something in an
emergency, so be prepared. This is an easy way to administer artificial
ventilation to someone in the early moments of a cardiac or respiratory arrest.
There is even a nipple to introduce medical oxygen into the mask if it is
available.
When purchasing the mask, be sure that it has a one-way valve to allow the
client’s exhaled air to exhaust away from your face.
There should also be a little white disc inside the mask that is a micro
filter for infectious organisms.
Place this mask over the client’s face with the narrow tip pointing
toward the forehead. Seal the mask
to the face using the E-C technique. Placing
the index finger and the thumbs around the hard plastic part of the mask in a C
shape and grasp the jawbone with your last three fingertips, forming an E.
The C presses down on the mask to seal it to the face while the E lifts
the angle of the jaw and hyperextends the neck to open the airway, assuming
there is no spinal trauma. Maintain hyperextension while using the pocket mask.
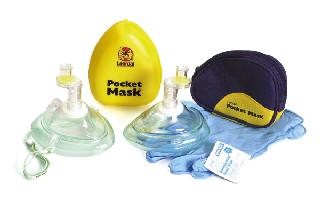
Pocket Masks
During ventilations observe carefully for signs of emesis.
If the client begins to vomit, remove the mask and turn the client on the
side to allow the contents to flow out, then wipe away any additional emesis and
resume ventilation. Have suction available and utilize it rapidly if necessary.
Some masks have an elastic band that goes around the back of the
client’s head so the mask does not fall off between ventilations.
This band does not provide a seal for the mask, so sealing must still be
done manually.
Bag-Valve-Mask
If the client is not be breathing adequately, either too fast, too slow,
too shallow or not at all, provide ventilation with a bag-valve-mask.
Preferably, it should be attached to a supplemental oxygen source at high
flow (10 L/m or more as necessary to keep the reservoir inflated). A
bag-valve-mask with a reservoir and high flow supplemental oxygen should deliver
nearly 100% oxygen concentration. If oxygen is not available, make sure that the
bypass orifice is allowing room air to be used.
Once the oxygen reservoir is inflated, place the mask over the client’s
nose and mouth with the smaller area of the mask over the nose and make a seal.
Compress the bag at a rate of once every five seconds if the client is just not
breathing. If the client is under
CPR, compress the bag every fifth cardiac compression. Have the compressor pause for this ventilation.
Use a steady slow motion to compress the bag.
If the compression is too quick or forceful, it can encourage gastric
distension. If the client’s head is not hyperextended adequately that will
also encourage gastric distension. Observe chest expansion during each
ventilation to assure adequate, but not excessive, ventilation.
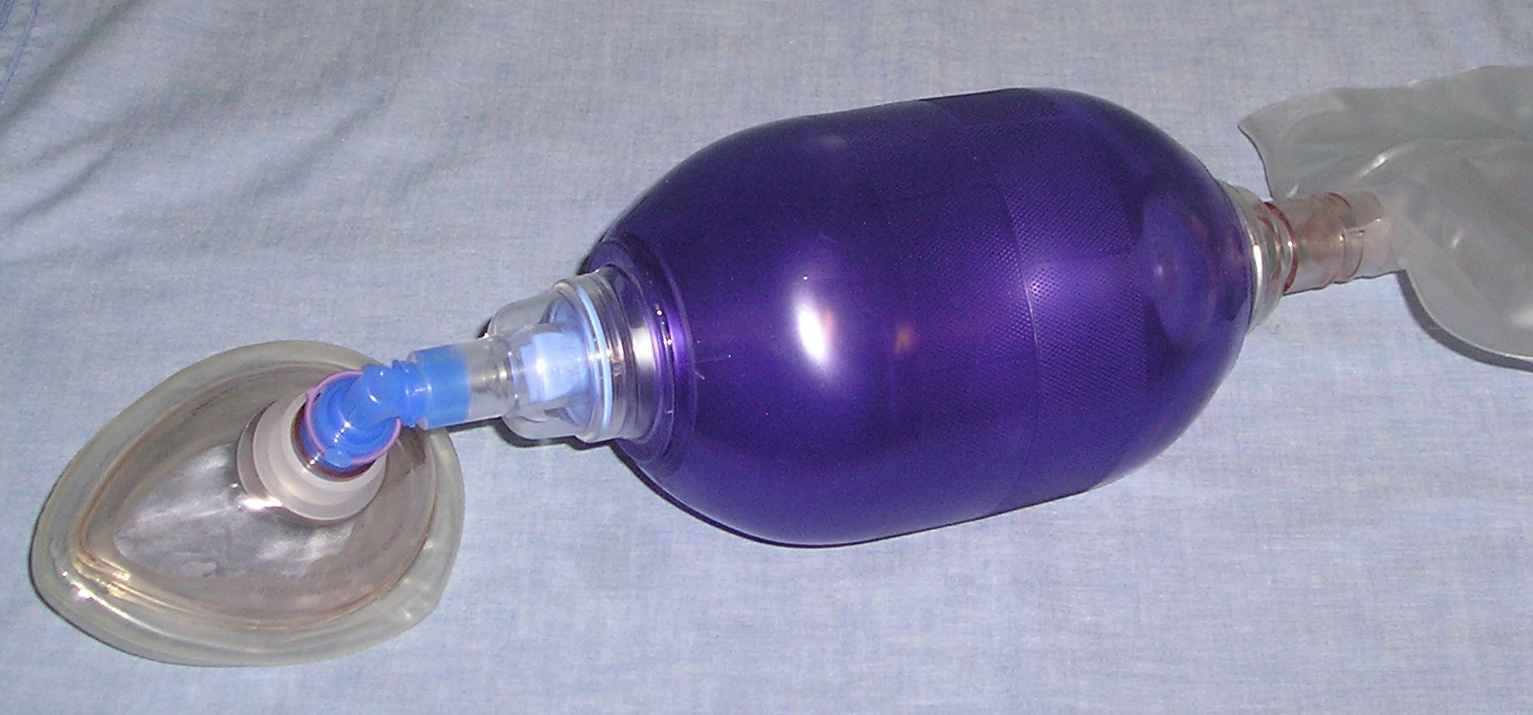
Bag-Valve-Mask (BVM) With Reservoir
The mask should be sealed to the face using the E-C technique.
Place the index finger and the thumbs around the hard plastic
part of the mask in a C shape and grasp the jawbone with the last three fingers,
forming an E. The C presses down on
the mask to seal it to the face while the E lifts the angle of the jaw and
hyperextends the neck to open the airway. Maintain hyperextension while using
the bag-valve-mask device. There is no humiliation in having two people
operate the bag-valve device. They
are not easy to operate unless you do so frequently.
During ventilations observe carefully for signs of emesis.
If the client begins to vomit, remove the mask and turn the client on the
side to allow the contents to flow out, then wipe away any additional emesis and
resume ventilation. If suction is
available utilize it rapidly instead of turning if the client is unconscious.
During CPR, if a bag-valve device is being used after tracheal intubation, ventilations are generally done once every fifth chest compression. However, the compressor need not pause during ventilations after intubation. Positive pressure is exerted on the lungs, sufficient to ventilate the client.
Suction
Suction is an airway adjunct.
It is imperative that when you have a client who is not able to maintain
his/her own airway, you have suction out, assembled and fully functional. It is too late to get it when it’s needed.
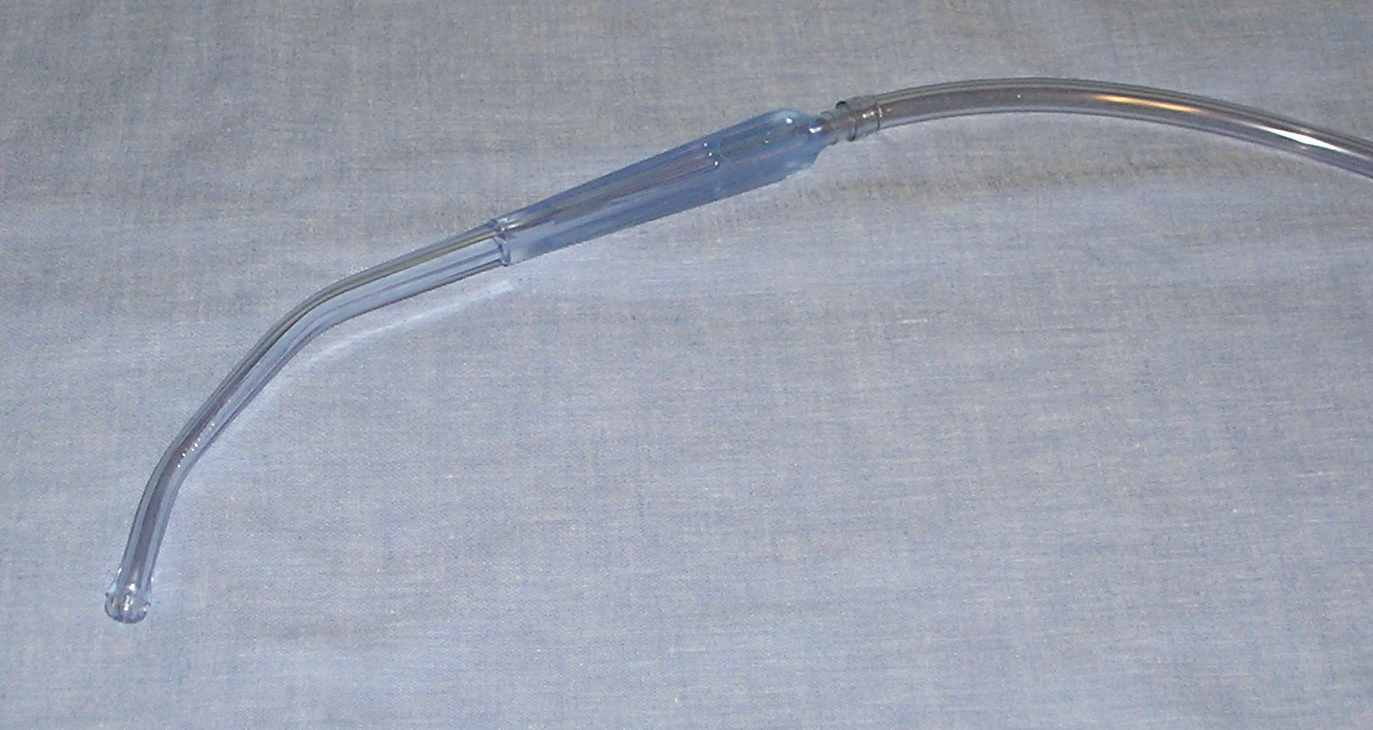
Yankauer Suction Tip
Cricoid Pressure
During
basic airway management and until the tracheal tube is placed, American Heart
Association recommends use of cricoid pressure, sometimes referred to as the
Sellick’s maneuver (Cummins, 2001). This
will help decrease gastric distension and prevent gastric contents from entering
the airway and being aspirated into the lungs. It also helps the operator visualize the vocal cords while placing a
tracheal tube.
Produce
cricoid pressure by finding the cricoid ring, gently grasping it between the
index finger and the thumb and placing a gentle backward pressure toward the
spine. Use caution in doing this if
C-spine injury is suspected.
Advanced Airway Assessment & Intervention (Secondary ABCD)
The
ACLS Approach refers to advanced procedures as the secondary ABCDs. Before beginning advanced intervention, it is wise to reassess client
findings reported to you for any inaccuracies or changes. If there are inaccuracies in reported findings, you should have a
positive, diplomatic discussion after the incident aimed at teaching, not
criticizing and well away from onlookers.
At
the advanced level we not only assess the parameters our BLS cohorts do, but we
further assess breath sounds as part of the “A” assessment. We can also use
pulse oximetry if it is available.
Pulse Oximetry
More
and more prehospital providers are including pulse oximetry in their protocols.
It is another tool in the tool bag to assist with client care. Like other assists to assessment, oximetry should not supercede diligent
physical assessment; it is an adjunct.
There
are numerous models of pulse oximeters available; therefore, refer to the
manufacturer’s instructions when operating one. Note: Do not use pulse oximetry in a pulseless client under
CPR. It is also ineffective in
hypothermic clients.
Tracheal Intubation (TT)
In
the past this was referred to as endotracheal intubation. The American Heart Association’s new term is simply tracheal intubation
(TT) (Cummins, 2001). Though there are other devices available the TT is the
golden standard for resuscitation airways. It is a solid, secure method to directly ventilate the client, some
first-line cardiac drugs can be administered through it, and stomach contents
are blocked from entering the airway.
Just
a short aside at this point - while the AHA recommends instillation of certain
drugs into the TT during resuscitation when an intravenous line (IV) is not
available, they state that it is not certain what actual dose is effectively
obtained at the blood level. For
that reason, this should not be the primary drug administration route, but an
interim measure.
Tracheal
intubation is a skill that must be maintained in practice or in skills labs.
While a relatively simple procedure, it can be fraught with disaster at
many junctures.
Endotracheal Tube With Stylette
Before
attempting intubation, check the laryngoscope light to see that it is bright and
tight. Compare the TT to the size
of the client’s little finger. It
should be nearest that size. Open only the top of the sterile package containing
the correct sized TT, leaving the tube in the package while you check the
integrity of the ballooned cuff. Connect a 10-20 cc syringe to the pilot tube on
the TT and inflate it with 10 ccs of air. Gently
compress the cuff through the package to assure that it holds air. Evacuate all the air from the cuff, leaving the syringe on the pilot tube
so that it doesn’t stray away during the procedure. Place a semi-rigid stylet into the tube so that the tip does not exceed
the tip of the TT or protrude from the side port. Bend the end of the stylet over the top edge of the TT so
that the stylet cannot migrate unintentionally during the procedure.
Have
a suction device at hand and be ready to suction. It is too late to get it and set it up after the need arises.
Also have at hand a commercially prepared device made specially for securing the
TT or tape as described in your local procedure.
You
will need a stethoscope to auscultate breath sounds after TT placement. Current Advanced Cardiac Life Support Guidelines from the AHA also
encourage use of an additional device to assure proper TT placement beyond just
auscultation of breath and epigastric sounds (Cummins, 2001). That can be either an end-tidal CO2
detector or an esophageal aspirator.
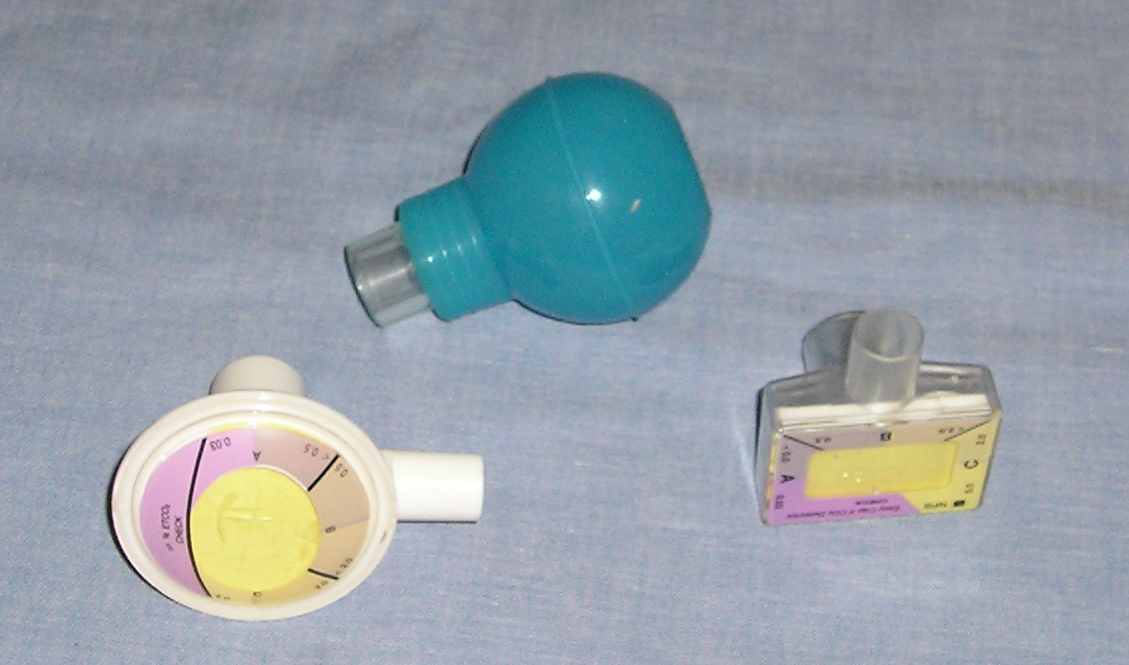
CO2 Detectors and Esophageal Aspirator
With
the client supine assume your preferred position of comfort at the client’s
head. Grasp the laryngoscope with the left hand and enter the opened mouth on
the right side. Proceed into the
mouth advancing the blade with a right-to-left sweeping motion. The laryngoscope
is a left handed instrument and is not a pry bar. Use an up–and-away motion to
open the airway. Aim the tip of the laryngoscope handle where a wall of the room would
come into the ceiling. The blade should be nowhere near the upper teeth if you
are using the proper motion. Broken teeth equal poor technique.
If
you are using a curved MacIntosh blade, the tip should rest in the valecula to
visualize the vocal cords after the lifting motion. Adjust your position until you get a clear view of the cords.
Often the blade is in too far and should be slowly retracted until the cords are
clearly seen. You may need suction at any point in this procedure, so have it
ready. Once the cords are clearly visible introduce the TT from the right side
into the throat and past the vocal cords. Do
not introduce the tube close alongside the blade as that will obstruct your view
of the cords. Once the cuff of the tube has disappeared advance the tube only
slightly farther so that when the cuff is inflated it does not rupture the
cords. Introducing the tube farther may allow intubation of the right mainstem
bronchus. Many brands of TT now have a line or dot where the tube should be at
the cords.
An
attempt at tracheal tube intubation should take no more than thirty seconds.
If the operator nears that time (s)he should be notified and
abandon the attempt. Immediately
institute BLS measures to re-oxygenate the client before making another attempt
at intubation. When tube placement
fails it is because the operator did not clearly visualize the cords and/or did
not intentionally watch the tube go past the cords into the trachea.
If
you are using a Straight or Miller blade introduce it past the valecula and lift
all the structures. Often the
novice operator introduces either type of blade too far, so it may have to be
retracted some to allow visualization. Once the TT is in place remove the
laryngoscope and HOLD ONTO THAT TUBE UNTIL IT’S FASTENED with a holder or
tape. American Heart Association
is recommending use of a specially designed device made to secure tracheal
tubes.
Immediately
inflate the cuff to the manufacture’s instructions and remove the syringe.
If you are using the end-tidal CO2 detector place it on the TT then the bag-valve and
ventilate the client. Listen first
to the epigastrium, then the lung fields. There
should be no sound in the epigastrium and good breath sounds over all lung
fields. If there are gurgling sounds over the stomach when you ventilate the
client, you have intubated the hypopharyngeal area. In that case deflate the cuff and remove the tube, reventilate the
client and try intubation again. After at least six ventilations the window in
the end-tidal CO2
detector should turn from purple to yellow (remember - Barney to Big Bird).
An
aside about end-tidal CO2
detectors - it is not reliable if it has been stored or handled improperly
(consult package instructions) or if gastric contents have come in contact with
it. If the client has recently had a carbonated beverage the
reading may be unreliable as well.
If you are using an esophageal aspirator instead to confirm placement, compress it completely and place it on the TT before attempting ventilations. If it stays compressed, you may be in the esophagus or if it reinflates the TT is most probably in the trachea.
When
auscultating epigastric and breath sounds to confirm TT placement it makes sense
to auscultate the epigastrium first. The
stomach is a finite bag and will quickly fill to capacity with air after only a
few ventilations with the bag-valve device. It is easiest to hear gurgling or the whoosh of air into the stomach at
first before the stomach fills. While air will probably exhaust into the bowel
the sounds will not be as distinct as at first. Then you can move on to auscultate the lung fields and if you
are in the lungs with the TT you will hear good bilateral breath sounds. If you
hear breath sounds over the right lung only, you are in the right mainstem
bronchus. Deflate the cuff and with
each respiration retract the tube slightly until you hear breath sounds in the
left lung as well. Be cautious not
to retract too far and displace the tube entirely. Reinflate the cuff.
Note
the TT’s black line and corresponding number at the tooth line and remember
that for later documentation. Secure
the tube with tape or a commercially prepared device made for securing tracheal
tubes. Reassess breath sounds and continue to ventilate. If the client is not breathing continue ventilations at 12-15 per minute
or once every five seconds. Once a
TT is in place if full CPR is in progress, chest compressions do not have to be
interposed with ventilations as they must be when there is no tube in place.
If
you delegate ventilation to another provider observe their attention to chest
compliance and tube placement to assure adequate ventilation continues. Each time the client is moved, reassess the breath sounds. You are
ultimately responsible for the airway and adequate oxygenation of the client.
When
a client has sustained facial trauma and the mouth is distorted in the absence
of LeFort type fractures ,
a nasotracheal intubation may be necessary. The issue of LeForte fractures is important because the cranial vault can
be inadvertently intubated if there is a fracture of nearby facial bones. This
intubation is easiest when the client is breathing.
Lubricate
the appropriate TT with water-soluble gel, preferably with a xylocaine mixture
(if allowed in your protocols). With
the client’s head in a neutral position insert the TT into the nostril to the
posterior hypopharynx.
On
the next inspiration the tube should advance easily into place. Use a gentle pressure in advancing the tube to avoid unnecessary trauma.
If you meet resistance to the tube, remove it and attempt the intubation
through the other nostril.
Once a TT is in place, if electrical therapy is initiated, AHA recommends that the oxygen source be turned off during that time and then immediately restored (Cummins, 2001). Apparently research revealed a significant number of burns subsequent to defibrillation or cardioversion in an oxygen rich environment.
Combitube
According
to American Heart Association’s 2000 Science there are a significant number of
studies indicating that tracheal tubes are often misplaced, especially on
pediatric clients. For this reason
they have added two more airway adjuncts to ACLS courses. One is the Combitube or “tube for all holes.”
It is a large tube with two cuffs and holes in various locations. The principle behind this tube is that it can be inserted blindly into an
airway and it will end up most likely in the esophagus or more rarely actually
in the trachea.
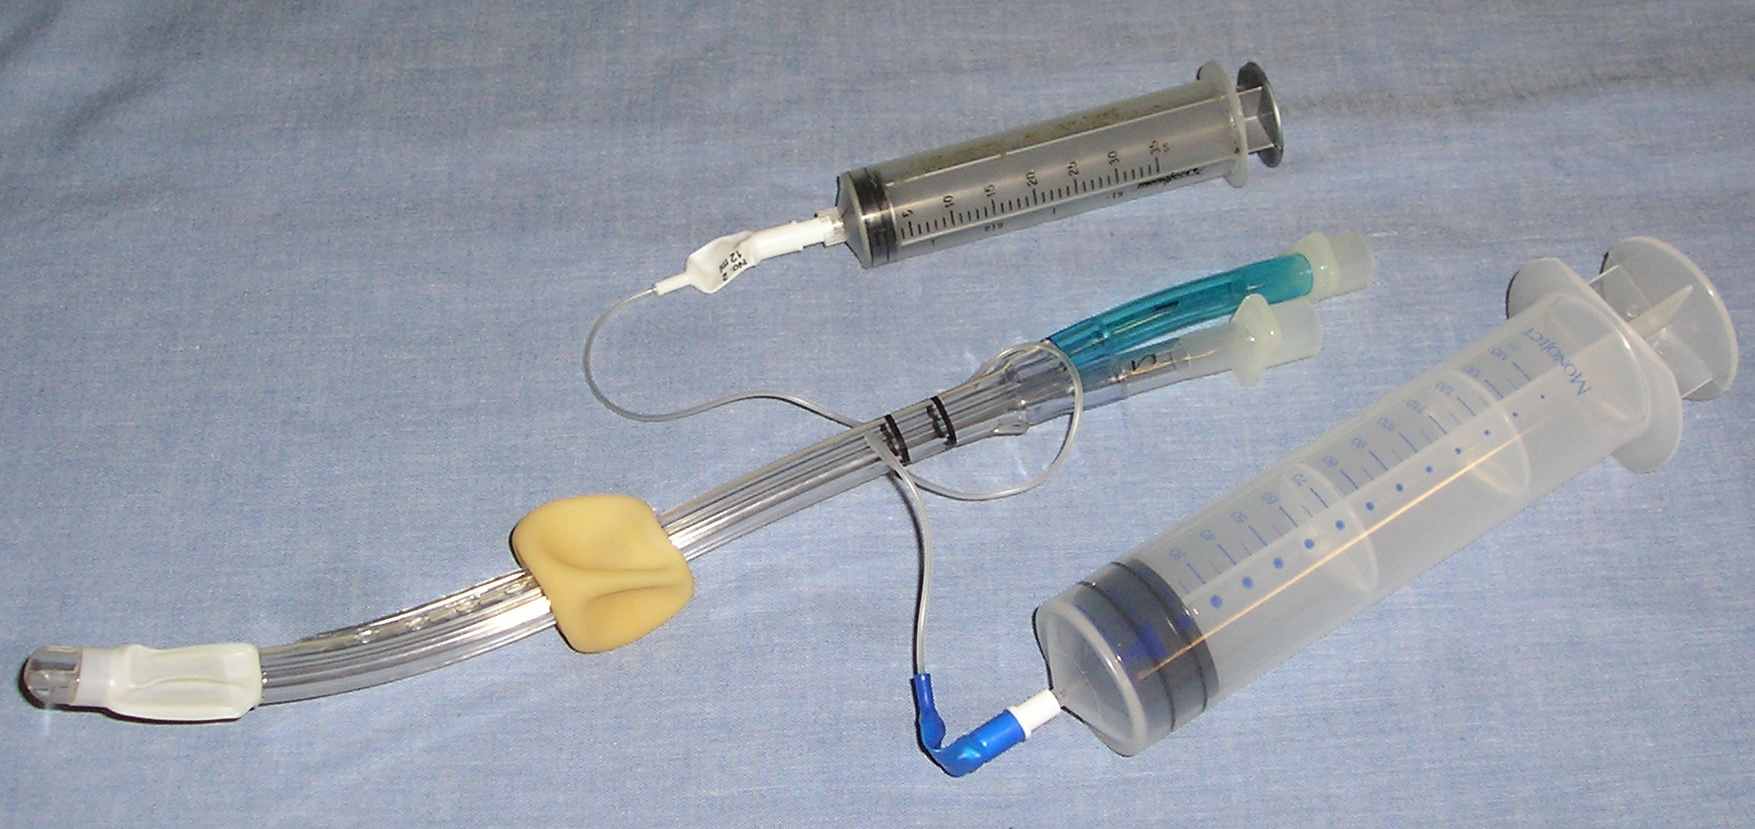
Combitube
With
the head in a neutral position insert the Combitube into the posterior
oropharynx and continue on down until the black marks are at the lips. Inflate both cuffs, the blue cuff first and the clear one second.
Ventilate the blue orifice first and if that causes breath sounds the
tube is in the esophagus. Continue
to ventilate through that orifice. If the blue orifice does not result in breath
sounds ventilate the clear orifice. If
that causes breath sounds the tube has positioned in the trachea. There should be good bilateral breath sounds with one of the orifices.
Again, it is most desirable to have a tracheal tube in place, but the
Combitube can be an adequate backup and you may see them used in prehospital
EMS.
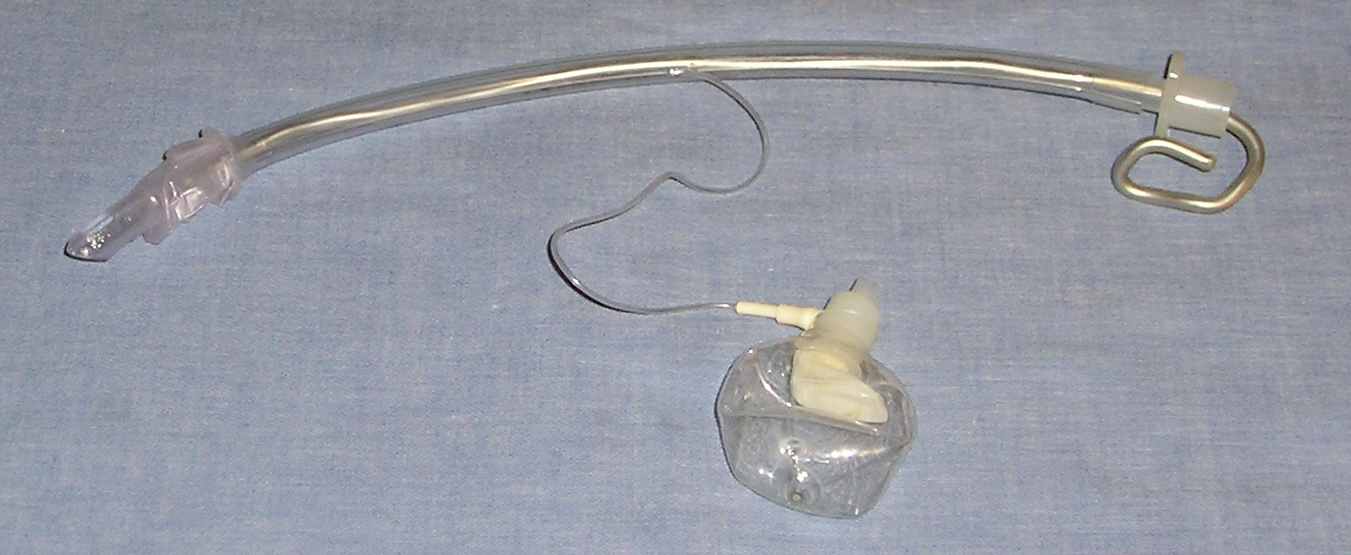
Laryngo-Mask-Airway
(LMA)
The
second device added to advanced airway management is the LMA. It is currently used in surgery for short (less than 40 minutes)
procedures. Anesthesiologists
appreciate this alternative to the TT. While
it looks simple to insert, in a recent ACLS course an anesthesiologist-ACLS
student told this instructor that it is not as easy as it appears and that as
with any procedure it takes some time to be efficient at it. There is also the issue of cost - they are fairly expensive, though they
are reusable with correct professional decontamination.
It
is unlikely these tubes will be used widely in the prehospital setting because
of cost and decontamination issues. Clients
in the operating room or recovery room may have an LMA in place for a procedure
before they actually have respiratory failure and ventilation can be continued
through the LMA. LMAs may also be
seen in emergency departments according to local preference. Note that drugs cannot be instilled through the
LMA.
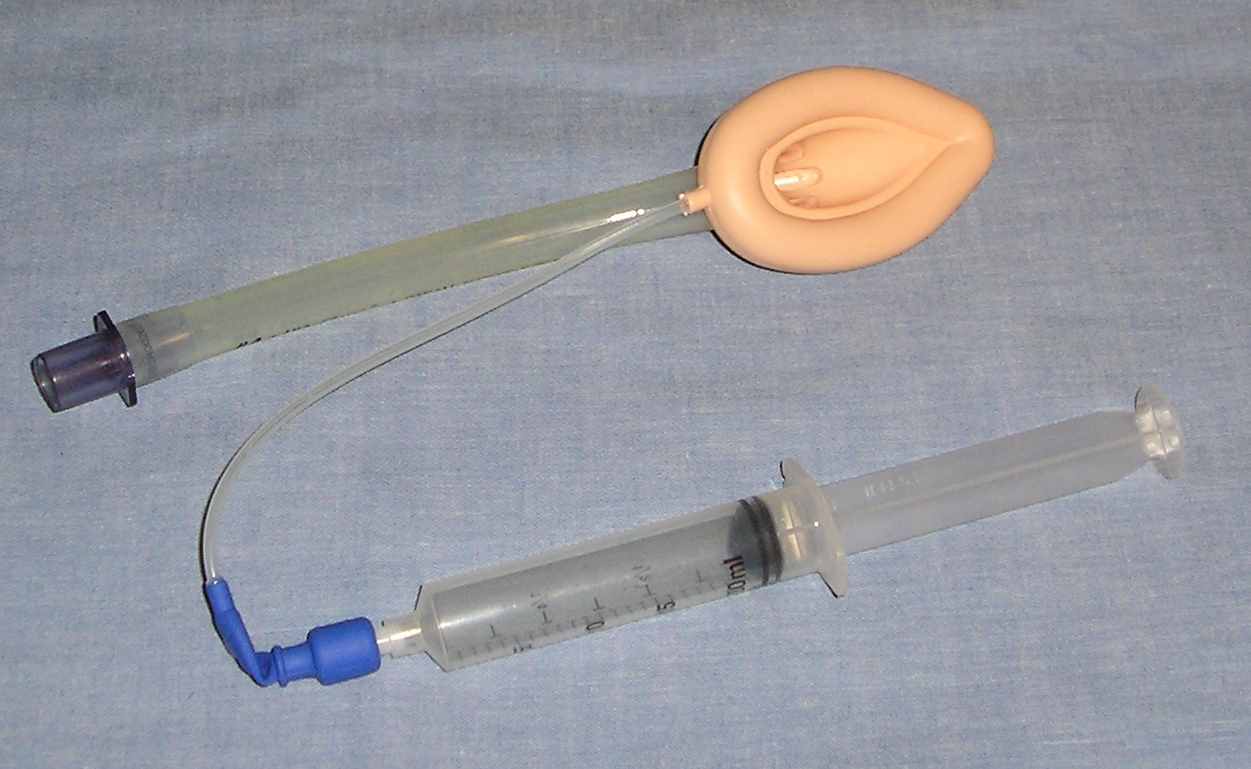
Laryngo-Mark Airway
Using
the correct size LMA, test the cuff, then evacuate all the air. Lubricate the cuff generously with water-soluble gel.
Fold the cuff into a gentle circle with the index finger over the top of
the tube pointing to the tip. Introduce
the tube into the posterior hypopharynx. Once
the tube has assumed the circular shape of the esophagus continue to advance the
tube until it wedges at the epiglottis. Inflate
the cuff according to manufacturer’s instructions and ventilate with a
bag-valve. There should be adequate
bilateral breath sounds. Some
operators leave a slight amount of air in the cuff to keep it from collapsing on
itself during insertion. There are
several methods for introduction of the LMA; this is just one.
It
must be noted that the manufacture of the LMA does not recommend these airways
for less-controlled situations such as resuscitation. They are best designed for a client that is
NPO and
is not being moved around. That
is why the LMA is so well suited to the perioperative client, but will be
replaced with the TT if the client arrests.
Transtracheal Ventilation/Cricothyrotomy
The
client with massive distorted facial trauma or other unmanageable obstruction
may need to be ventilated through either a transtracheal catheter or a
cricothyrotomy. To prepare to
perform the transtracheal ventilation utilize a 12 or 14 gauge over-the-needle
catheter with a 10 cc syringe. Prep
the anterior neck using provodine-iodine or alcohol swabs/pads. Identify the cricoid cartilage and the cricohyroid membrane
and the thyroid cartilage. The
membrane is the small, depressed space between the two cartilages. Prep the site
generously.
Once
the site is located and prepped, introduce the needle-syringe set midline in a cephalocaudal
direction at a forty-five degree angle, firmly but carefully piercing the
membrane. Once the membrane is
penetrated, air should be easily aspirated to confirm correct placement. Advance
the catheter over the needle while retracting the needle until the hub of the
catheter is at the surface of the neck. Completely
remove the needle and secure the catheter to the skin. Connect an oxygen “Y” or “T” tubing connector and administer jet
insufflations for one second and allow exhalation for four seconds.
As
you can imagine this is a very tenuous airway and it is difficult to manage, but
may be life-saving in an emergency. This
airway requires constant attention. This is only the most temporary airway and an alternate more
reliable one should be secured as soon as possible. Jet insufflation does not
allow for adequate carbon dioxide elimination. There also is the possibility of
creating a pneumothorax, hemorrhage, subcutaneous or mediastinal emphysema while
performing this procedure.
More
commonly seen is the cricothyrotomy. Though
this is a more invasive technique it is somewhat easier to manage. There are many commercially prepared kits for this procedure.
If you are using a prepared kit, follow the manufacturer’s
instructions.
Identify
the cricothyroid membrane and prep the area generously. Make a vertical incision through the skin with a sterile scalpel.
A vertical incision is less likely to cause hemorrhage. Make a horizontal stab wound through the membrane.
Rotate the blade of the scalpel one-quarter turn to create an opening and
insert the largest possible pediatric TT. If
it has a cuff, inflate it. Connect the orifice of the tube to a bag-valve device
with supplemental oxygen. Confirm
placement by auscultating over the epigastrium for sounds.
Use
extreme caution when doing this procedure as misguided incision can be
disastrous. Damage can occur to the larynx or surrounding structures. There is also the possibility of hemorrhage, subcutaneous or mediastinal
emphysema.
Needle
Chest Decompression (NCD)
A
tension pneumothorax is perhaps one of the most dramatic emergencies in
prehospital and in-hospital care and one for which intervention is absolutely
critical. Usually it is the result
of blunt chest trauma. Air leaks
into the pleural space during inspiration through a check-valve-like opening and
cannot escape, thus increasing the pressure in this space. As this space increases in size it begins to displace nearby
structures. The opposite lung is
being compressed and the trachea begins to shift AWAY from the affected side.
This increases the work of ventilation and as the shift of structures
further increases the superior and inferior vena cavae are compressed which
decreases blood return to the right side of the heart. Blood backs up in systemic veins and the client becomes
shocky.
Clients
with a tension pneumothorax may have extreme dyspnea, restlessness, anxiety, a
rapid, weak pulse and distended jugular veins. On auscultation breath sounds are diminished on the affected side and the
chest will percuss hyperresonant on that side.
There is sometimes subcutaneous emphysema. A late and ominous sign is deviation of the trachea away from the
affected side.
Treatment
of the tension pneumothorax is extremely urgent. To decompress the affected lung
at the preferred site locate the second intercostal space at the midclavicular
line (Sanders, 2001). An alternate
site is the fourth intercostal space at the midaxillary line.
Palpate
the site and prep the site generously with alcohol or provodine-iodine. With a 14 gauge over-the-needle catheter and syringe, insert the catheter
just above the upper border of the rib. This
location involves less chance of injuring nearby nerves or arteries. There should be a “pop” sensation as you enter the pleural space.
Air may push on the plunger of the syringe. Advance the catheter one to two inches as you withdraw the needle.
DO NOT LET GO of the catheter until it is secured. Tape the hub securely.
Attach a flutter valve or tape a condom, with the closed end cut off, to the
syringe after you remove the plunger. The
client’s condition should improve remarkably.
“C”= Secondary Circulation
Secondary “C” includes recognition of the rhythm, defibrillation, cardioversion, transcutaneous pacing, IV access and IV medications.
These topics are discussed in another section of the ACLS series.
“D” Secondary Definitive Diagnosis
Secondary “D” includes the differential diagnosis. These are possible causes of the problems you are dealing with. This topic is discussed in another section of the ACLS series.
Bibliography
Hazinski, M.F., Cummins, R.O. & Field, J.M. (Eds.) (2000). 2000 Handbook of Emergency Cardiovascular Care for Healthcare Providers. American Heart Association.
Cummins, R.O. (Ed.) (2001). ACLS Provider Manual. American Heart Association
Sanders, M.J. (2001). Mosby’s Paramedic Textbook. (2nd, Ed). Mosby: Philadelphia.